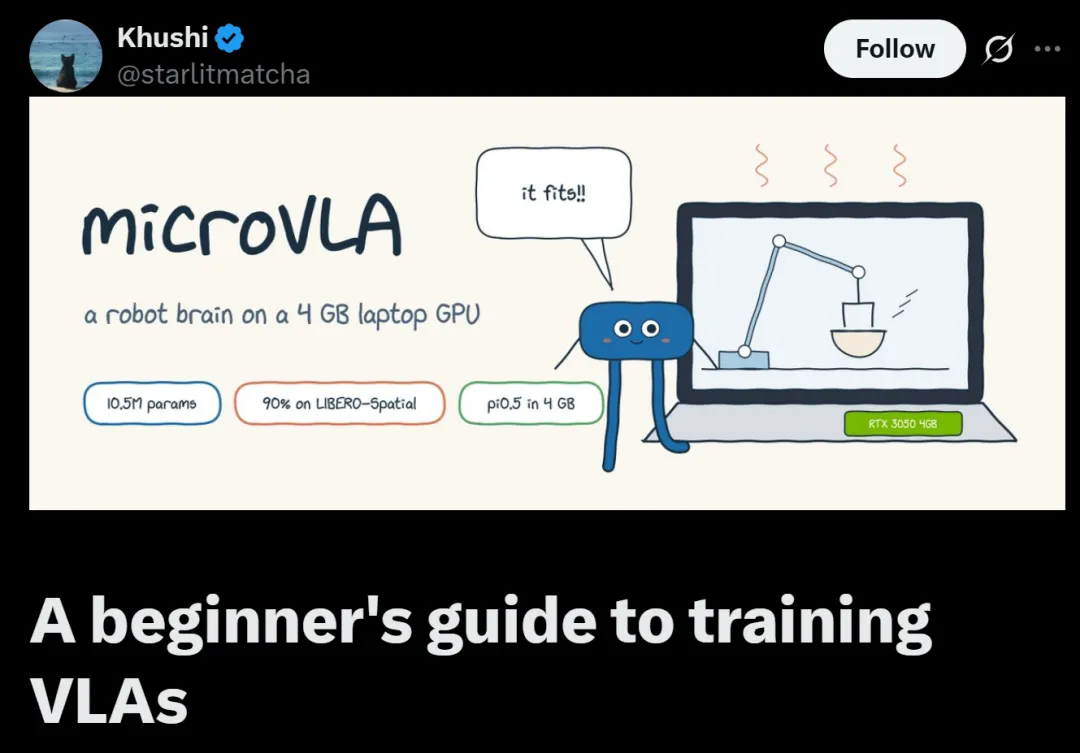
The previous blog covered the history of VLA and its evolution. After writing this, I wanted to get my hands dirty and do some experiments around VLA.
A brief history of VLA: from RT1 to MolMoAct2
Unfortunately, I don't have much computing power. I stumbled upon nanogpt, which aims to train a GPT-like model with as little computing power as possible. I thought, I could do something similar on my laptop's GPU too! !
That was how microVLA began. This is a short development log recording my intuition and thoughts while developing this project :)
Background and motivation
A quick note for readers who don't know VLA: In VLA, you give the model a camera image and an instruction, such as "pick up the black bowl next to the plate and put it on the tray," and the model outputs motor instructions that control the robotic arm.
I wanted to get my hands dirty with VLA to develop a better intuition. But most recent models, such as π0 and π0.5, have billions of parameters, use a lot of computing power to train, and are too large to run efficiently on mobile chips.
Apart from that, I also want to do some architecture ablation experiments and learn about inference optimization of VLA. nanogpt provided a clear example to follow, so I started developing the project using Claude.
The goal is: how to complete simple training and inference on the GPU of a laptop, while making the code easy to understand and modify, so that I can iterate quickly.
Let the training run
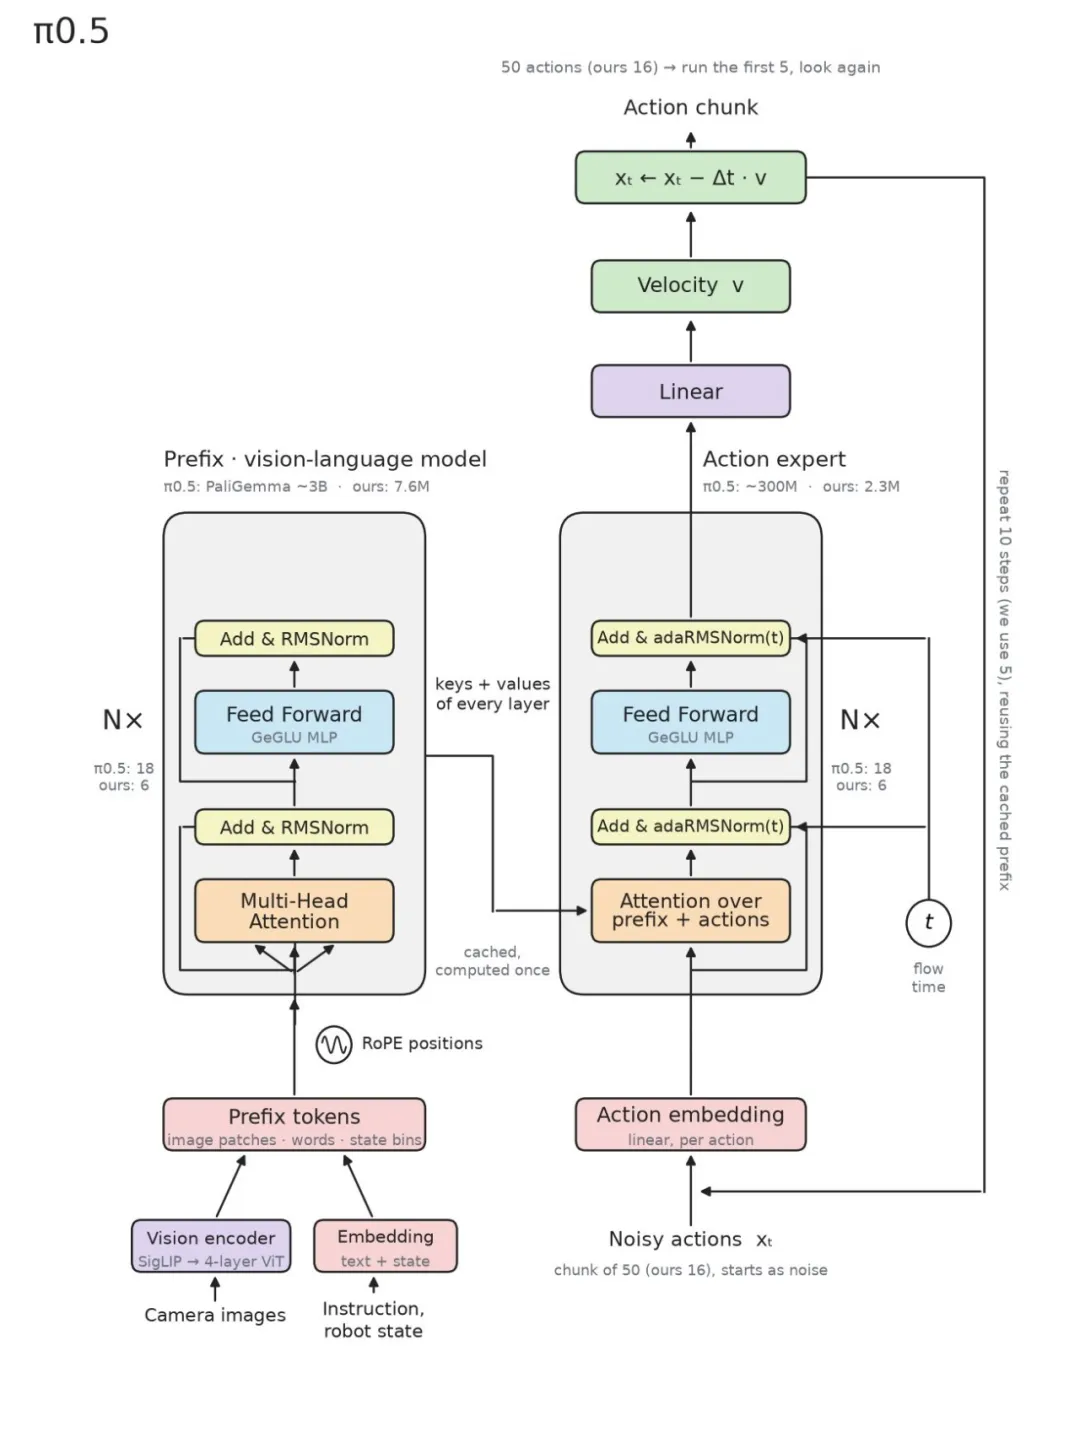
Figure 1: π0.5, and how our 10.5M parameter version shrinks parts.
I chose π0.5 as the model architecture I wanted to implement because:
- It was popular;
- It is developed by a very strong team that also participated in the development of the first batch of VLA;
- I like it.
Simply put, VLA predicts an action block based on image patches, language instructions, and robot state. Action Expert—a smaller, Transformer-based model—predicts actions based on the prefix data it sees.
Actions are generated through Flow Matching. Take a real action block from a demonstration, then take a random noise with the same shape, and draw a straight line between the two:
The direction along this line is always , so the model learns to predict the direction of travel from points along this line.

When executing an action, we start from pure noise, take several steps along the predicted direction, and finally get an action block. The math is a bit hard to understand, though, so here's a more intuitive diagram that helped me better understand the math.
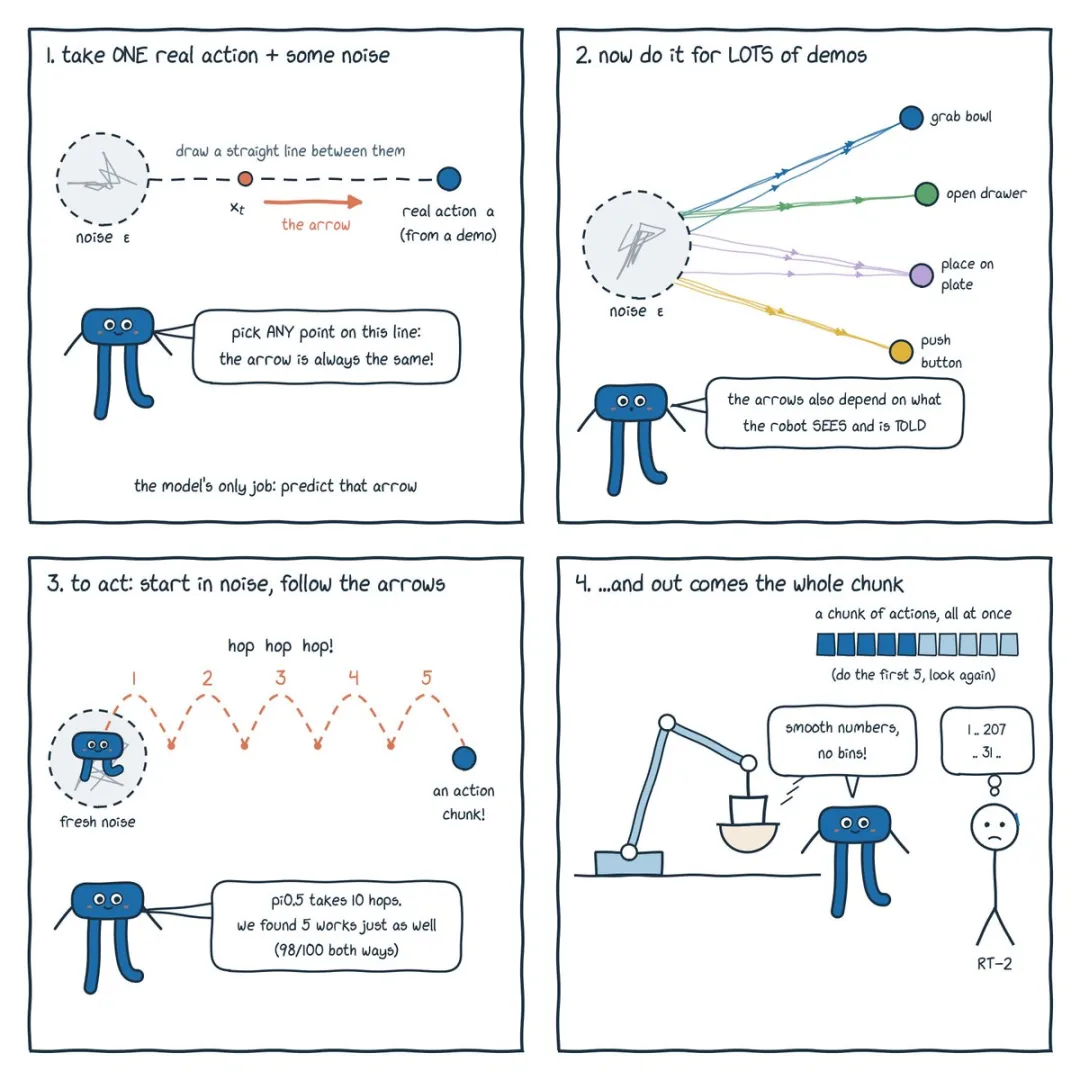
Figure 2: Flow Matching explained with four panels.
Basic implementation and rationality check
I scaled down π0.5 to about 10.5M parameters: a 4-layer Vision Transformer (1.9M), a 6-layer Prefix Transformer (5.7M), and a 6-layer Action Expert (2.3M). Before starting training, I want to do a sanity check on the entire configuration.
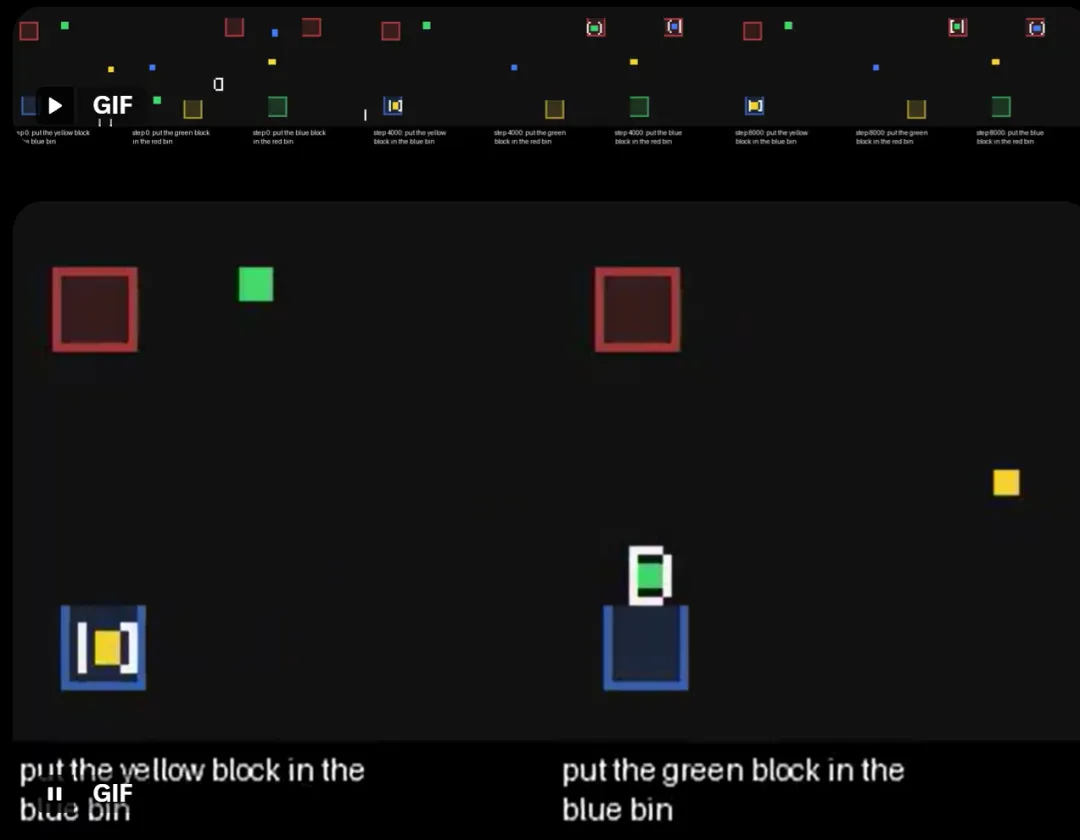
Initially I wanted to start with LIBERO - which I did train on later - but doing sanity checks with it would take too long, so I created a toy dataset and toy problem for the VLA to solve. The toy world is a 2D pick-and-place environment running on the GPU, with two colored squares, two colored boxes, and the instruction "Put the red square into the blue box."
The model started training and the loss dropped, but the robotic arm basically didn't know what to do. I recorded the cosine similarity between the predicted movement direction and the expert's movement direction: if the model had learned the correct movement, this value should be close to 1. The model was not learning useful visual features.
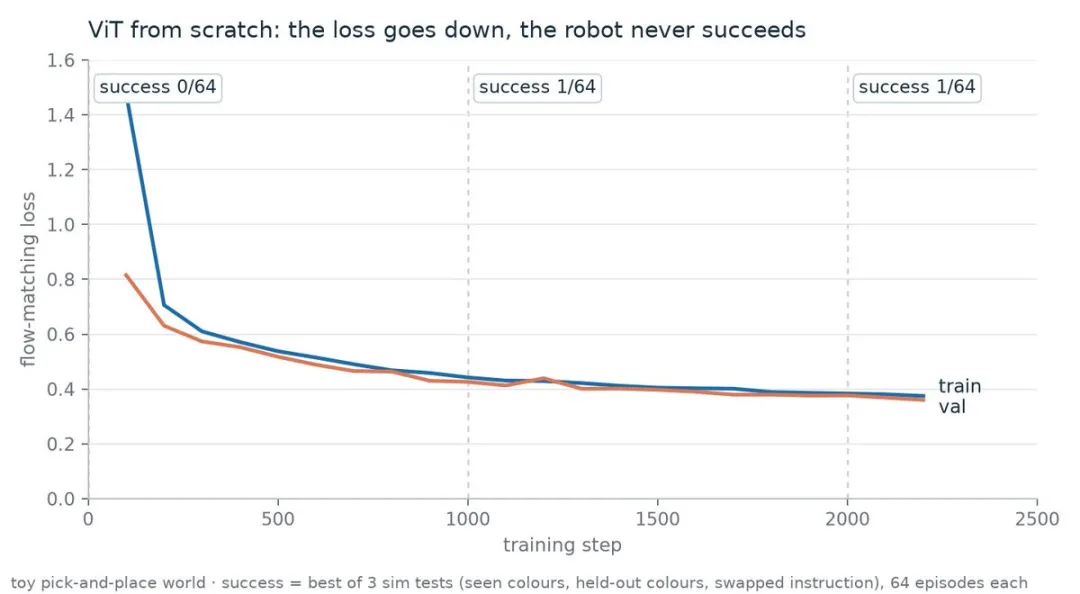
Figure 3: First run, training ViT from scratch: the loss looks normal, but the robot doesn’t make any useful moves.
Before trying to fix the visual issue, I wanted to confirm that the problem was indeed visual. Therefore, I trained another version: instead of giving the model images, the true positions of the squares and boxes were given as token input. This version achieved a directional cosine similarity of 0.86, opened and closed the gripper 93% of the time correctly, and it responded to commands.
That is to say, except for vision, other parts work normally. You can understand this by thinking about what a visual encoder needs to accomplish: With just a loss signal telling it "your movements are a little off," a small ViT has to learn what a square is, where it is, and how to distinguish between different colors. This is a very weak signal for learning visual abilities. The real π0.5 also doesn’t learn vision capabilities from robot data; it starts with pre-trained SigLIP.
Therefore, I can choose to use a pretrained visual backbone network or distill it into my model. Using SigLIP directly would bring the number of parameters in the visual part to about 90M, almost ten times the size of the rest of the model, which defeats the purpose of building a small VLA.
So I opted for distillation: before any movement training began, let my little ViT learn to imitate a frozen SigLIP. After passing through a linear layer, the patch features of small ViT are trained using cosine loss and MSE loss to match the patch features of SigLIP on the same image. I adjusted the input size of SigLIP so that both models generate the same mesh of patches. This way, each patch of my ViT gets the information the larger model sees at the corresponding location.
It worked immediately:
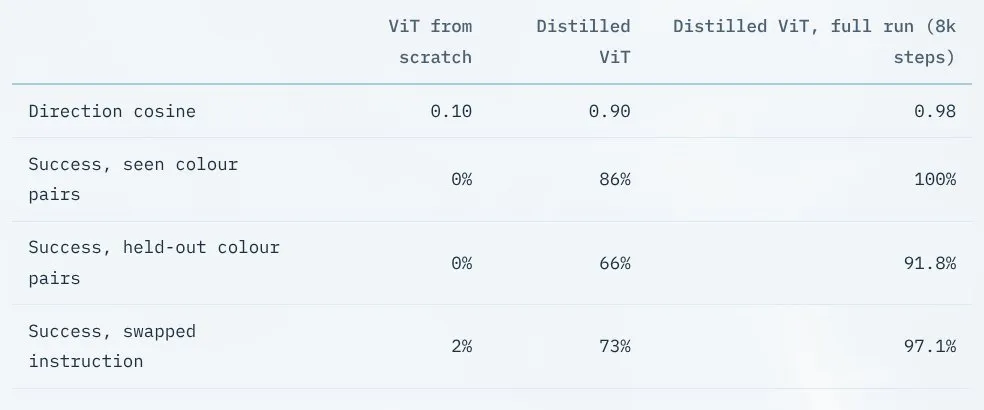
The first two columns correspond to the same short experiment trained for only 1,200 steps, with the only change being the visual encoder. Unseen color combinations and swapped instructions are the tests I care about most. The model achieved a score of 91.8% on color combinations it had never seen during training, and was able to follow the altered instructions in the same scenario. This shows that the model is indeed reading instructions, rather than memorizing actions.
TRAINING ON LIBERO
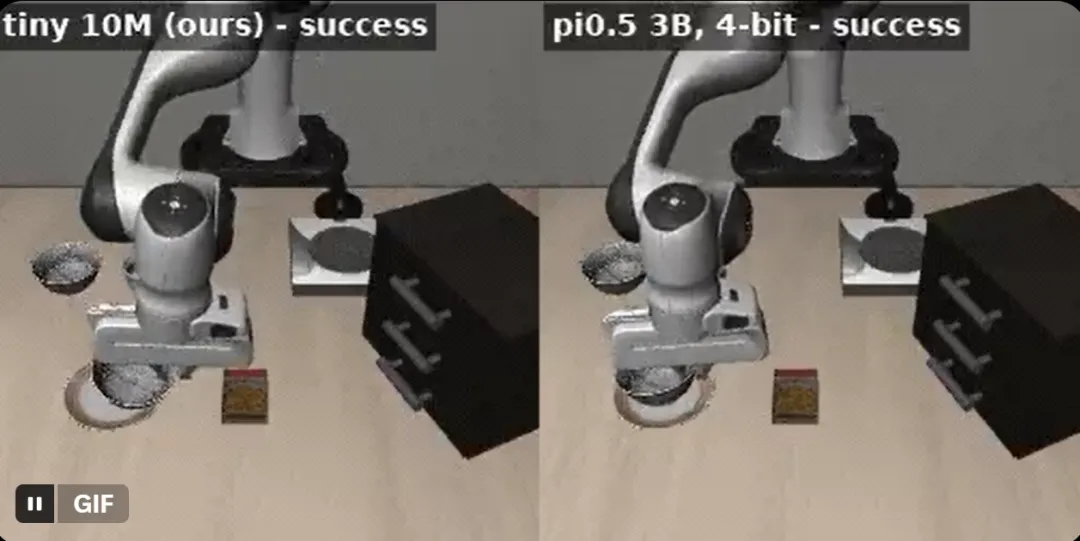
After running through the toy world, it's time to try out the real robot Benchmark. I chose LIBERO because most VLA papers—including π0.5—report scores for it. Specifically, I chose LIBERO-Spatial: which contains 10 tasks such as "Pick up the black bowl next to the plate and put it on the tray." The objects in these tasks are always the same, but their positions change.
The data includes 432 human demonstrations, approximately 53,000 frames, and two camera views: one observing the scene and another mounted on the wrist. I scaled the image down to 96 pixels so that all the data could fit into the GPU.
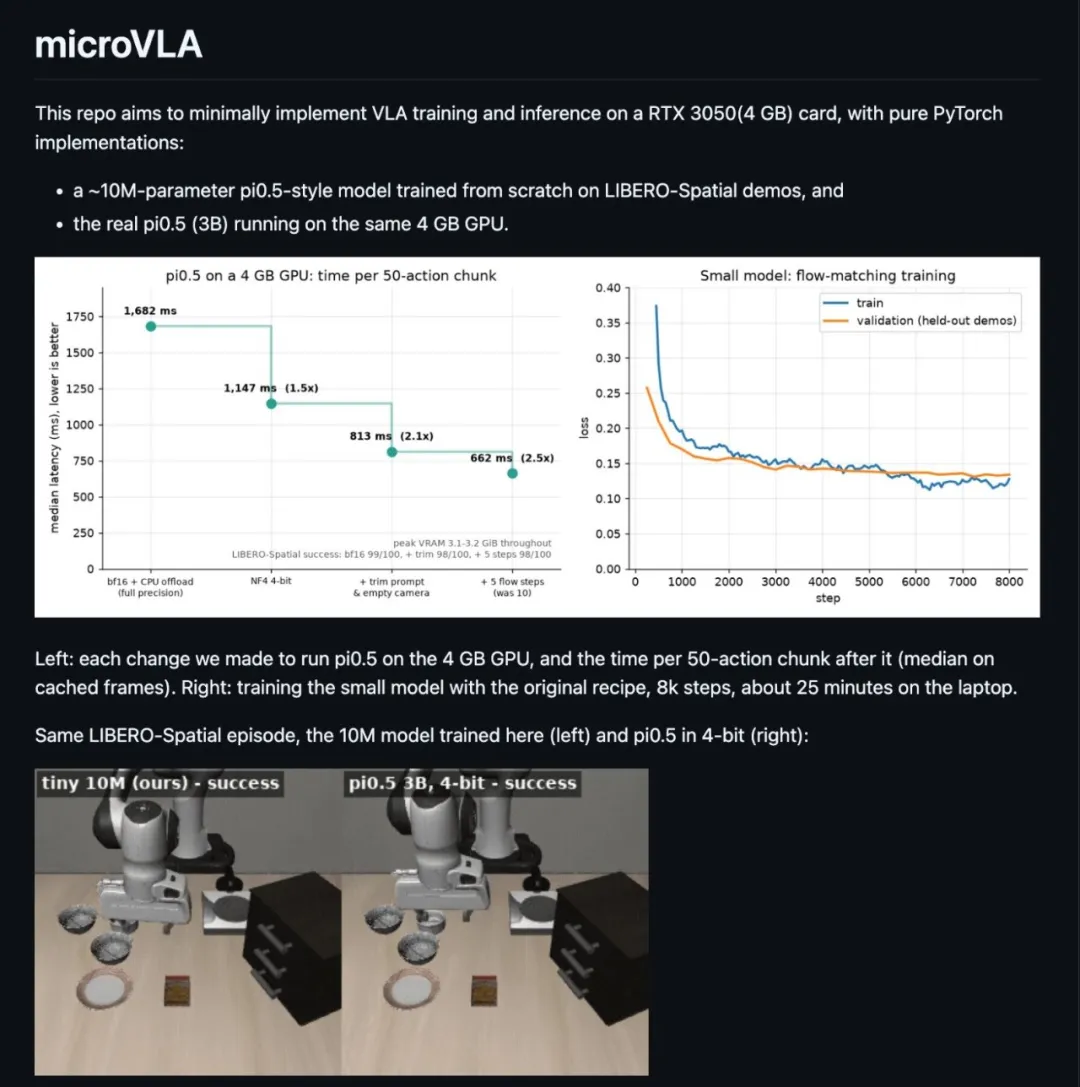
The training method is the same as in the toy environment: SigLIP distillation followed by 8,000 steps of Flow Matching. Training took about 25 minutes, and the model successfully completed 75 out of 100 episodes, with inference time of 70 milliseconds per action block. Very good!
Is the model actually using the input?
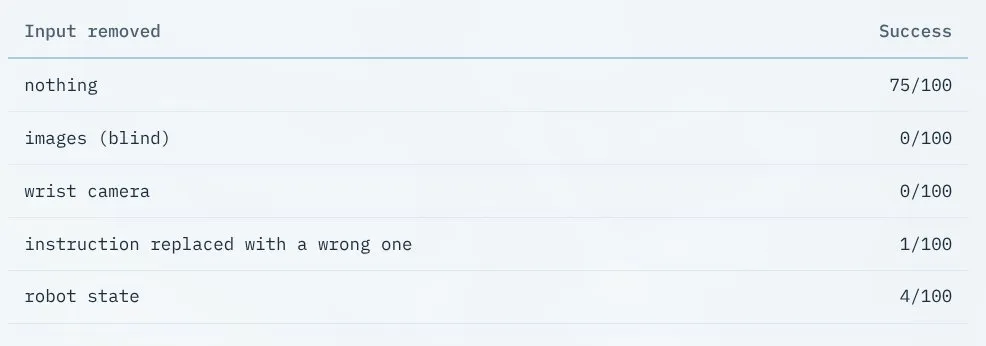
A score of 75% might give the impression that the model has learned the task, but in reality, the model might simply have found a shortcut, such as always performing the same action from the same starting position.
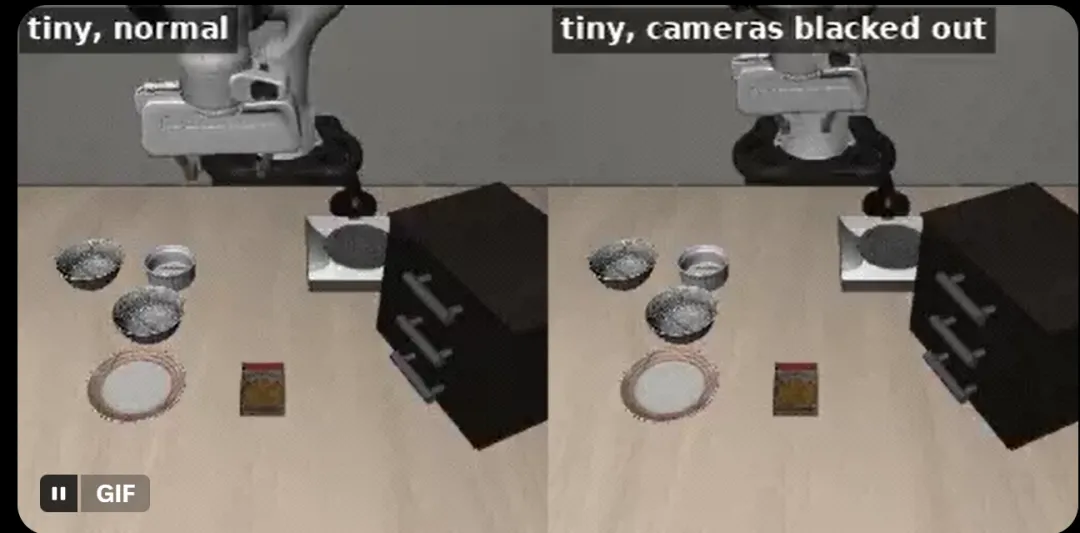
So I remove one input at a time and run the model again:
Breakthrough 75%
Before making any changes, I divided the Benchmark. Each LIBERO mission has 50 fixed starting layouts, so I used layouts numbered 0–19 to make decisions and didn’t touch on layouts numbered 20–49 until the end. This is to prevent overfitting.
The first round of changes included: extending the distillation time from 1,000 to 3,000 steps; increasing the batch size from 32 to 64 because the GPU was underutilized; using an exponential moving average for the weights; and adding color dithering so that the model cannot rely on accurate colors.
I trained the model for 30,000 steps to see when it stopped improving. The validation loss reaches a minimum at about 5,000 steps and then almost doubles from 0.135 to 0.264.
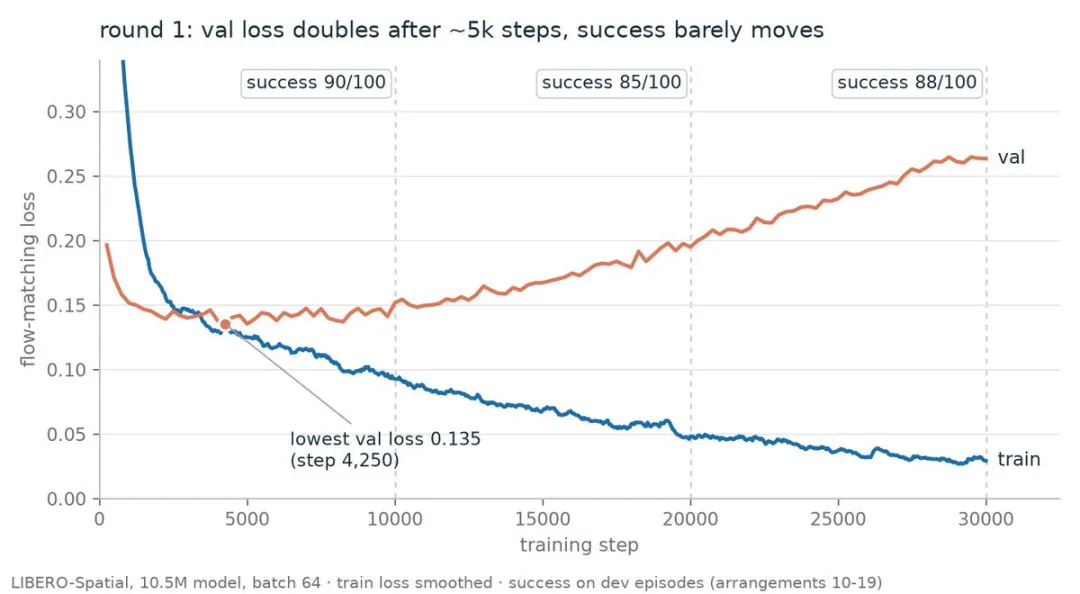
This is textbook overfitting, so I evaluated several checkpoints. I originally thought that the performance of later checkpoints would be very poor:
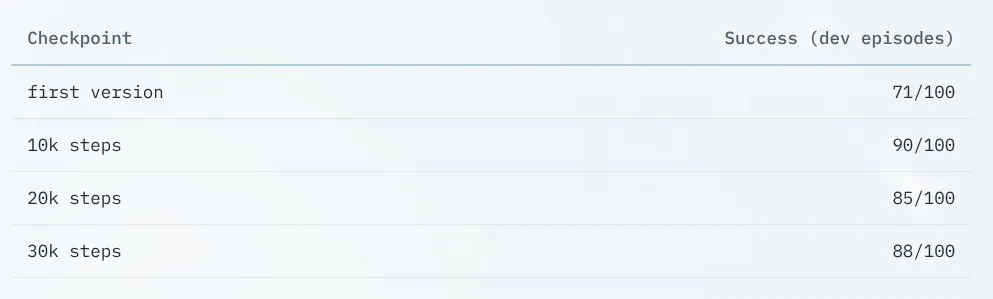
The validation loss doubled, but the bot's performance didn't drop as much as I thought it would. It only takes one good enough move to complete the task, as the next block of moves will correct it anyway. Therefore, how close the actions are to human actions - which is what the validation loss here measures - is not that important in this experiment.
The second round increased the image from 96 pixels to 128 pixels and trained for 10,000 steps, because I had a pretty reasonable explanation in mind: grabbing involves tiny distances, so more pixels should help. As a result, the 128-pixel model achieved 91/100, while the 96-pixel model achieved 90/100. Therefore, this explanation did not stand up to the test of the data.
This was followed by a final test on a previously unused initial layout numbered 20–49: the final model succeeded 270/300 times, or 90%; the first version succeeded 210/300 times. In the same 300 episodes, the new model succeeded 70 times where the old model failed, and failed only 10 times where the old model succeeded. So I can continue to improve this model, which is great!
Muon
The final experiment in training is Muon, the optimizer used by the modded-nanogpt speedrunning challenge.
Adam updates each value in the weight matrix roughly independently, while Muon orthogonalizes the entire update so that the weights move more evenly in all directions, rather than mainly moving in one or two directions where the gradient dominates.
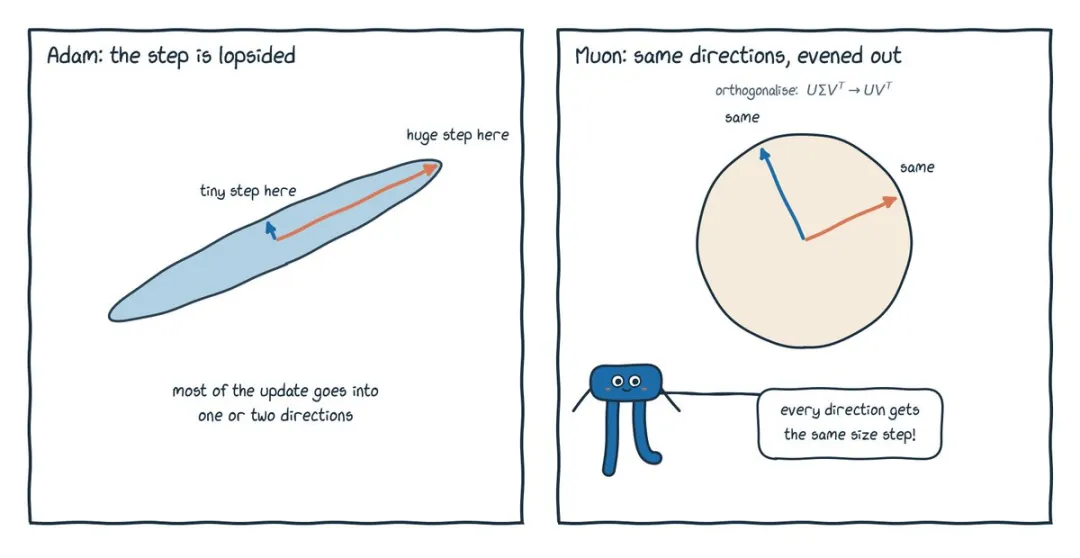
Figure 8: Muon preserves the direction of updates and makes the magnitude of movement more even in all directions.
Muon only works with 2D matrices, so I used it for the weights of the Transformer and ViT, and still used AdamW for the rest.
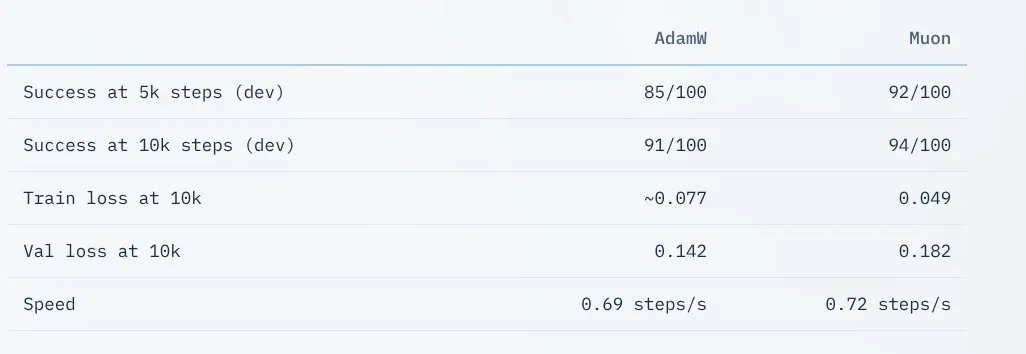
Muon fits the training data much better, the validation loss rises faster - same as above - while the bot's performance improves slightly.
In the near future I'd like to do more ablation experiments like this on different components of this VLA, study the performance impact of each component in detail, and maybe turn it into a speedrunning challenge :)
Running real π0.5 on 4 GB of video memory
The second half of this project also involves inference optimization. π0.5 has about 3B parameters, and with bf16 each parameter takes up 2 bytes, so the weights alone require about 6 GB.
My laptop only has 4 GB of available video memory, so the question is: how do I make it run, haha.
Try one: bf16 plus CPU unloading. Keep what you can on the GPU and copy the rest from CPU memory each time you generate an action block. This preserves full bf16 accuracy, but at the cost of a copy every time, limited primarily by the speed of data transfer between the CPU and GPU.
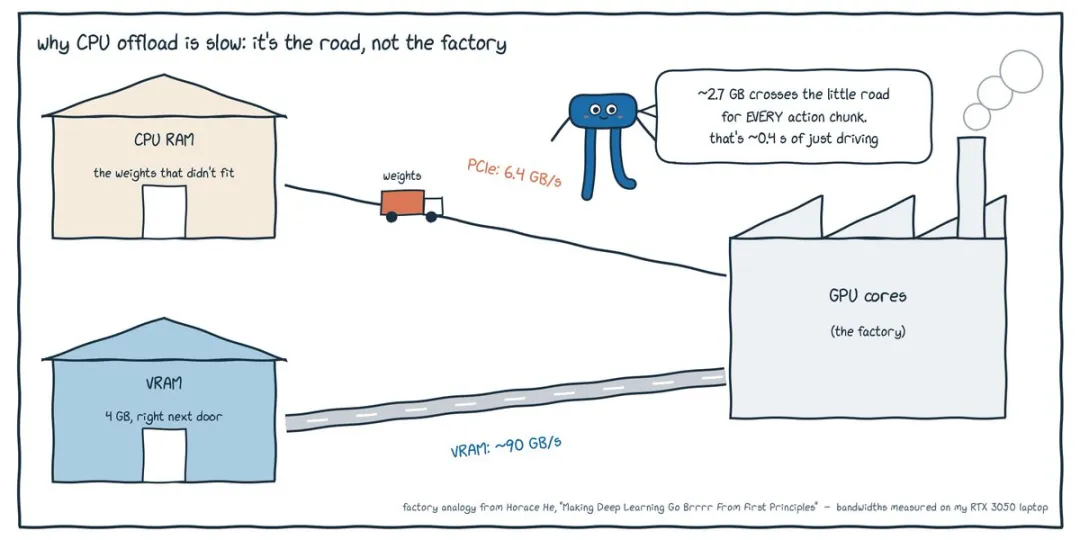
Figure 9: Refer to "Making Deep Learning Go Brrrr From First Principles" by Horace He.
Attempt 2: 4-bit weights. NF4 stores each weight in 4 bits and sets a scaling factor for each block. I quantized the visual and language parts, keeping Action Expert bf16, since it is smaller and is responsible for outputting actual numerical values, so I wanted to retain the accuracy of this part.
Loading the normal way builds the entire model in CPU memory first, which my laptop doesn't cope with very well. Therefore, I build the model on PyTorch's meta device: just create the shape, no real memory is allocated, and fill it in one tensor at a time.
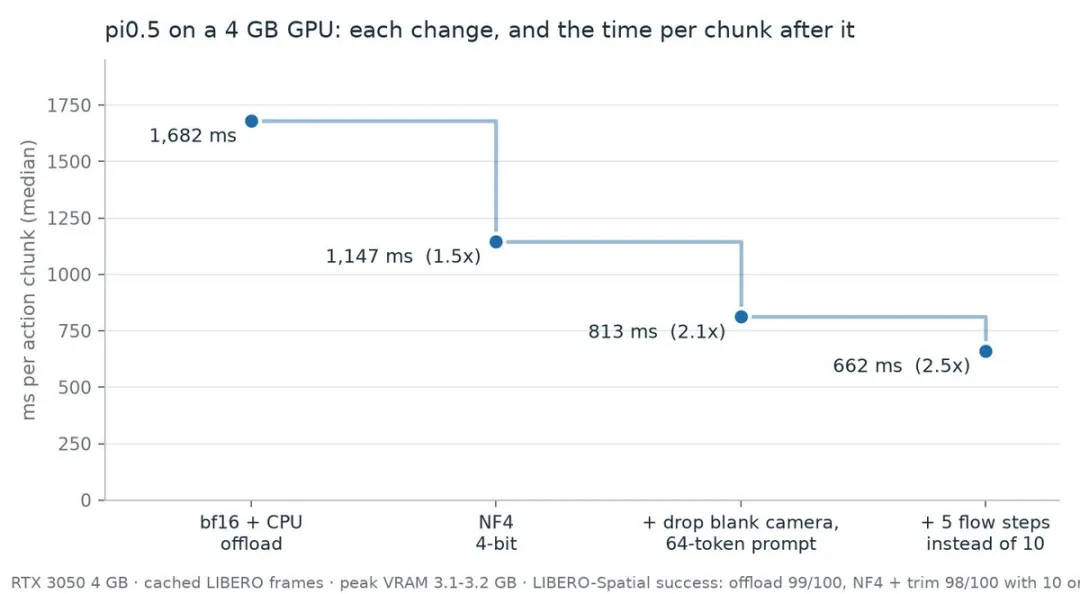
In this way, the model can finally be put down: inference takes 1,147 milliseconds and consumes 3.22 GB of video memory.
Next, I looked at what the model was actually calculating. LIBERO checkpoint has three camera input slots, but LIBERO only has two cameras, so the third slot is a blank image, but it still consumes 256 tokens. The longest command only requires 62 tokens, but the prompt is filled to 200 tokens.
Therefore, the prefix length is from:
reduced to:
The output is essentially the same—the motion change is about 0.002—and the inference time drops to 813 milliseconds.
Finally, there is the number of sampling steps for Flow Matching. Performance analysis shows that prefix calculation takes about 520 milliseconds, while each step of Flow Matching only takes about 30 milliseconds. So reducing from 10 steps to 5 only saves about 150 milliseconds at most. But there’s no cost in trying it: the result is 662 milliseconds.
Will the model become dumber as the speed becomes faster?
The above time consumption is measured on the saved image frames. The only important question is: Can the robot still complete the task? Therefore, I ran the model in the LIBERO simulator and tried to be as consistent as possible with the author's settings.
I also ran each setting on the same 100 episodes so that I could compare episode by episode rather than just overall scores.
Conclusion
To fit everything into a small GPU, you have to figure out where every byte and every millisecond is spent, and that's what this whole project is about.
I learned in depth how VLA works and how to manage and conduct good experiments; more importantly, I understood how the software and hardware work together. Everything is in the repository and the first version of the small model only takes about 25 minutes to train, so go ahead and mess with it :)
The developer says a future benchmark challenge could compare how quickly compact VLA models reach a fixed success-rate target.